Auto-scaling resources based on performance using Azure Monitor

Azure Spring Clean… what’s it all about?
The Azure Spring Clean event is the brain child of Joe Carlyle and Thomas Thornton. The idea is for people in the Azure community to share their knowledge and experiences, as well as promote best practice for deploying solutions into an Azure.
The event, which will see a new blog released every day during February 2020, will cover the following topics:
- Azure Monitor
- Azure Cost Management
- Azure Policy
- Azure Security Principles
- Azure Foundations
My small contribution to the Azure Spring Clean will be about Azure Monitor & auto-scaling resources based on performance.
A brief overview of Azure Monitor
As you would suspect, Azure Monitor is a monitoring service that is integrated into the Microsoft Azure platform. This monitoring tool can be utilised in the following ways:
- Diagnosis of problems within application using Application Insights
- Analysis of data captured using Log Analytics
- Generation of alerts and automation of tasks based on those alerts
- Monitoring of Azure Virtual Machines and Container instances
- Enable data visualisations using Azure dashboards
- Auto-scale resources using on metrics
Logs & Metrics
Azure Monitor collects two different types of data, logs and metrics. Metrics are numerical values that describe aspects of a system at a particular point in time. They are lightweight and capable of supporting near real-time scenarios. Logs contain different kinds of data organised into records with different sets of properties for each type. Telemetry, such as events and traces, are stored as logs as well as performance data. All of this can be combined for analysis when required.
Resources
Resources that have been deployed into Azure can be monitored using Azure Monitor. The utilisation and performance data collected about those resources can be used to generate notifications based on logs and metrics to initiate tasks, such as auto-scale. The Azure Monitor service collects the following data:
- Application monitoring data
- Guest OS monitoring data
- Azure resource monitoring data
- Azure subscription monitoring data
- Azure tenant monitoring data
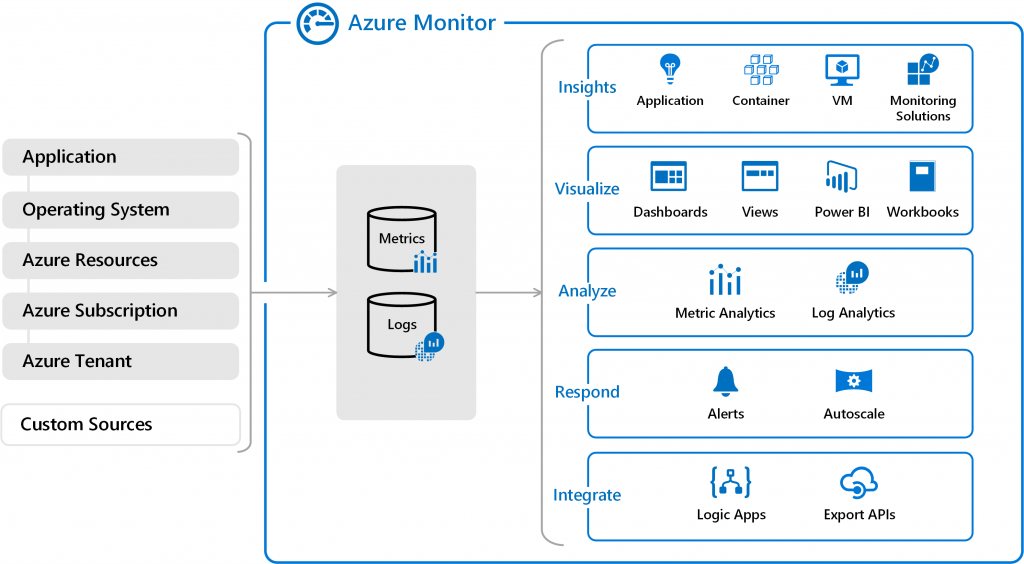
It is important to point out that using the Data Collector API Azure Monitor can collect data from any REST client, thus allowing for custom monitoring of other services.
Custom Sources
If customers have a requirement to monitor external systems, Azure Monitor can be used in conjunction with other Azure services to build a bespoke solution. Services such as Event Hub can be used for event ingestion. LogicApps can be employed to automate tasks. There are also various APIs available to get logs into and out of Azure Monitor.
So, that is an extremely brief overview of Azure Monitor. Now let’s get to the topic of this article, auto-scaling.
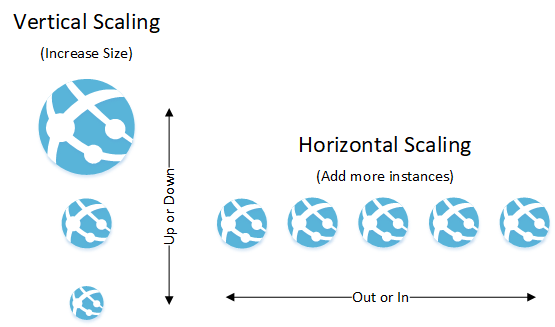
Auto-scaling Azure Resources
The auto-scale feature allows customers to scale their services up or out based on pre-configured criteria. Scale up, or vertical scaling, is when an instance size is increase or decreased. Scale out, or horizontal scaling is when multiple instances are created inline with the original instance.
For the purposes of this article we’re going to look at auto-scaling a WebApp based on performance. First we will need a WebApp, in true Blue Peter style, here’s one I prepared earlier (Note: those under 25 and outside of the UK please google that phrase – other search engines are available ). If you do not have a WebApp running and would like to create one, instructions can be found here.
Configure Auto-scale for your WebApp
Today we’re going to make our WebApp scale out horizontally, by increasing the instance count. To do this, with your WebApp up and running, navigate to Azure Monitor.
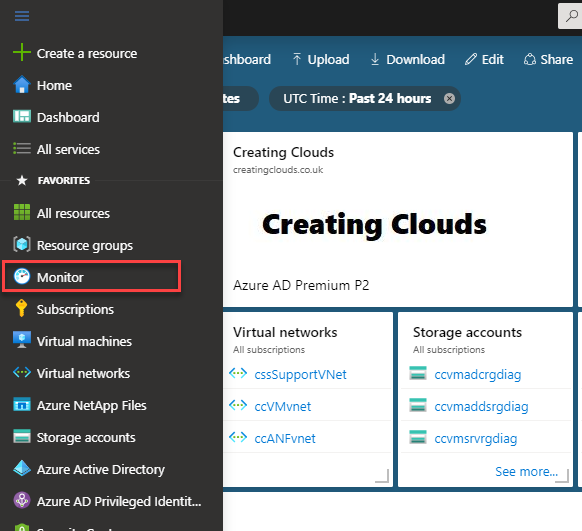
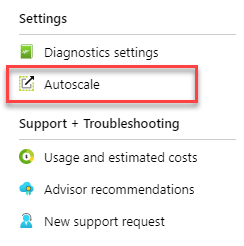
Once in the Azure Monitor blade, look for Auto-scale option, located down the left hand side under Settings. Click Autoscale
Here you should see your App Service plans. Those who have access to multiple subscriptions might not see their App Service plan listed. If you cannot see your App Service plan make sure your filter at the top is set for the correct subscription and resource group.
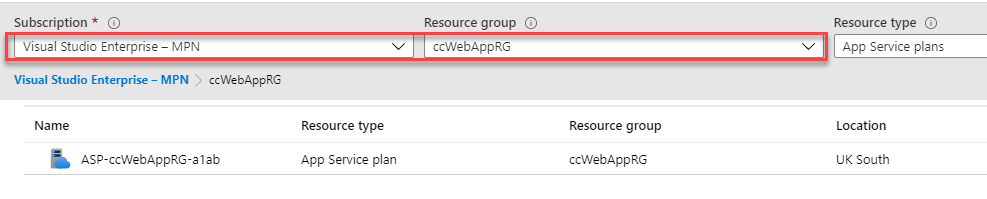
Click on your App Service plan and choose Custom auto-scale.

Next we need to configure the auto-scale settings. For this exercise I’m going to use Requests to the site to initiate the auto-scale in and out. Other metrics can be used as well, CPU load for instance.
To make this WebApp easy to auto-scale and test, use the settings in the image below.
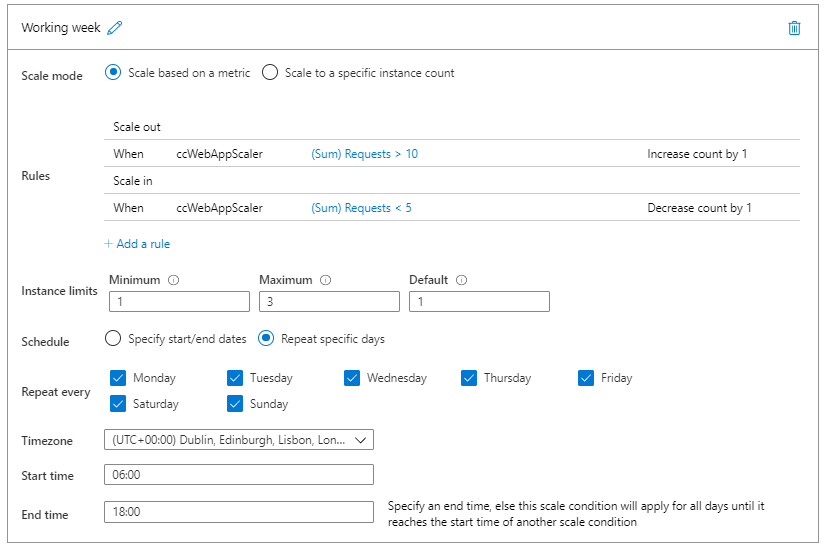
Give your auto-scale setting a Name and set the scale out and in rules. For the scale out rule I used Sum of Requests and set the rule to incease the instance count by 1 once more than 10 requests had been received to the WebApp. For the scale in rule I used the same metrics, but set it to reduce the instance count by one, once the requests had dropped to less than 5 over a 5-minute period. Once the requests received were more than 10 the WebApp will scale by 1 to a maximum of 3 instances. I also included a schedule, the auto-scaling rules will only take affect during this time period. The rules will only be in operation Monday – Sunday 06:00 – 18:00. Once completed click Save.
Testing the auto-scale rules
Now that we have the auto-scale rules in place, let’s go and generate some requests and get WebApp to auto-scale on-demand. To trigger the auto-scale rules, simply browse to your WebApp’s URL, you can find this in the WebApp service blade under Overview. Click the URL and then ‘mash’ the refresh key (more than 10 times) to initiate the auto-scale. You now need to wait 5 minutes for the auto-scale rule to scale down the WebApp once requests are less than 5 (don’t click that URL anymore).
Auto-scale logs
Once this has been done, return to Azure Monitor and select Auto-scale. Under the Auto-scale setting click Run History.

Under Run History you should see the events of the auto-scale up and down from the load requests you generated previously.
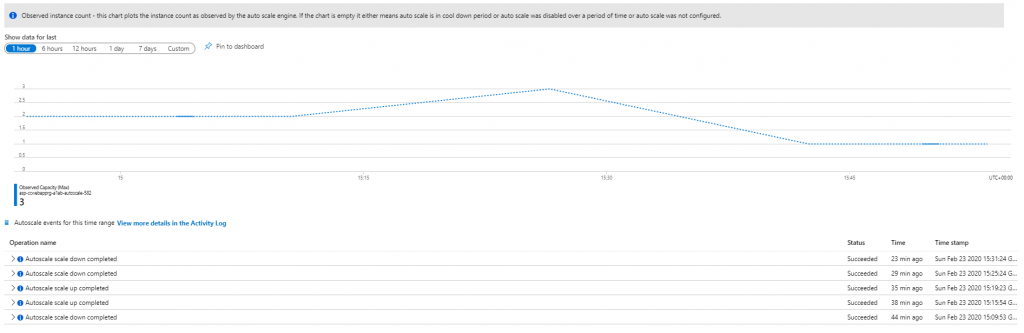
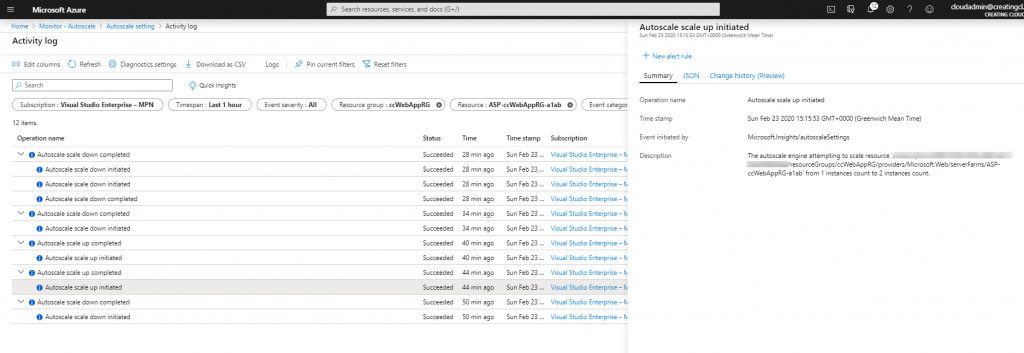
In the middle of the graph page you should see View more details in the Activity Log, click on it to open the detailed event logs.

Here you will find the activity logs that contain more details on events that have been processed during auto-scale operations.
As you can see from the image above, the WebApp has auto-scaled up once requests to the site reached more than 10. And it auto-scaled down once the requests were less than 5. Happy Days!
Summary
I hope my small contribution to the Azure Spring Clean has been useful to you? Azure Monitor is an extremely powerful resource that is available in Azure and sometimes gets overlooked. Using the auto-scale feature is one of many others ways Azure Monitor can help keep your Azure resources tidy and running at the correct level.
Many thanks to Joe Carlyle and Thomas Thornton for putting this event together and allowing me to participate. Another great example of the Azure Family working together.