Announcing IoT extension for Azure CLI 2.0

We recently released a new open source IoT extension that adds to the capabilities of Azure CLI 2.0. Azure CLI 2.0 includes commands for interacting with Azure Resource Manager and management endpoints. For example, you can use Azure CLI 2.0 to create an Azure VM or an IoT Hub. A CLI extension enables an Azure service to augment the Azure CLI, giving you access to additional service-specific capabilities. The IoT extension gives developers command line access to IoT Hub, IoT Edge, and IoT Hub Device Provisioning Service capabilities.
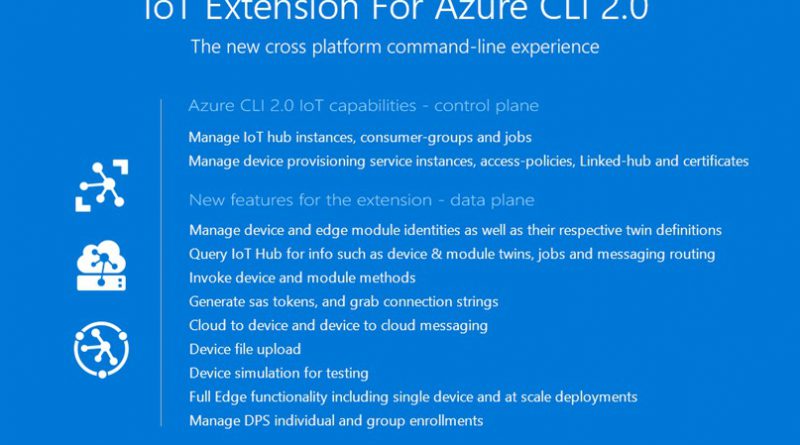
Azure CLI 2.0 enables you to manage Azure IoT Hub resources, device provisioning service instances, and linked-hubs out of the box. The new IoT extension enriches Azure CLI 2.0 with features such as device management and full IoT Edge capability.
The launch of this IoT extension means that we will be retiring version CLI 1.0 and the iot-hub-explorer tool. Azure CLI 1.0 and CLI 2.0 are at full functional parity.The Iot-hub-explorer and CLI 2.0 are at functional parity with the exception of CLI 2.0 currently missing event monitoring commands. We aim to provide event monitoring commands in early March 2018. We will deprecate the IoT extension for Azure CLI 1.0 and iot-hub-explorer by June 30, 2018.
Installation
Step 1 – Install Python
Python 2.7x or Python 3.x is required.
Step 2 – Install Azure CLI 2.0
Follow the installation instructions on GitHub or Microsoft Docs to setup Azure CLI 2.0 in your environment. At a minimum, your Azure CLI 2.0 version must be 2.0.24 or above. Use “az –version” to validate. This version supports az extension commands and introduces the Knack command framework. One simple way to install on Windows is to download and install the MSI.
Step 3 – Install IoT extension
The IoT extension readme describes several ways to install the extension. The simplest way is to run “az extension add –name azure-cli-iot-ext”. After installation, you can use “az extension list” to validate the currently installed extensions or “az extension show –name azure-cli-iot-ext” to see details about the IoT extension. To remove the extension, you can use “az extension remove –name azure-cli-iot-ext”.
Step 4 – Sign in
Run “az login” to sign in. Your subscription details are used to interact with target resources. You can login interactively, pass in account credentials, or use a service principal with password/certificate options.
Example
Here is an example to create a device identity and view the device twin. The example shows you how to login to your Azure account, create an Azure Resource Group (a container that holds related resources for an Azure solution), create an IoT Hub, create a new device identity, and then view the device twin. Complete the installation steps described previously before you begin. If you don't have an Azure account yet, you can create a free account today.
Step 1 – Login to the Azure account
Command: az login

Step 2 – Create a new resource group “IoTHubBlogDemo”
Command: az group create –l eastus –n IoTHubBlogDemo

Step 3 – Create a new IoT Hub “blogDemoHub” under resource group “IoTHubBlogDemo”
Command: az iot hub create –name blogDemoHub –resource-group IoTHubBlogDemo

Strep 4 – Create a new device in the IoT Hub “BlogDemoHub”
Command: az iot hub device-identity create –hub-name BlogDemoHub –device-id testDevice

Step 5 – View device twin
Command: az iot hub device-twin show –hub-name blogDemoHub –device-id testDevice

Contribution
This project welcomes contributions and suggestions. Most contributions require you to agree to a Contributor License Agreement (CLA) declaring that you have the right to, and actually do, grant us the rights to use your contribution. For details, visit https://cla.microsoft.com.
When you submit a pull request, a CLA-bot will automatically determine whether you need to provide a CLA and decorate the PR appropriately (e.g. label, comment). Simply follow the instructions provided by the bot. You will only need to do this once across all repos using our CLA.
This project has adopted the Microsoft Open Source Code of Conduct. For more information see the Code of Conduct FAQ, or contact opencode@microsoft.com with any additional questions or comments.
Feedback
Like all our tools and SDKs, the CLI extension welcomes feedback in the form of issues and pull requests directly in our repository, as well as in our feedback forum.
Source: Azure Blog Feed