Data-driven styling and more in the latest Azure Maps Web SDK update
It is with great pleasure that we announce the latest update to the Azure Maps Web SDK. The team has been working hard through the summer adding many powerful features and improving the overall performance of the Web Maps SDK. Some of the key improvements added to this update include:
- Developer focused API improvements
- New data source and layering model
- Connect multiple layers to a data source
- New easy to manage Shape class
- Data-driven styling of layers
- Spatial math library
- Support for geospatially accurate circles
Developer focused API improvements
We have enhanced our API interface to be more intuitive and improve performance. Previously, the majority of the functionality in the SDK was exposed as functions on the Map class. Without related functions being grouped together, developers often had to scan through nearly every function and property in the SDK hoping to find the function they needed. With this release we have grouped many related functionalities together and exposed them through manager properties on the map class. In the last version there were over 30 functions on the Map class, 7 of which were related to data layers. In this update, these functionalities are now exposed through the “layers” property of the map along with many additional functionalities that makes it easier for working with layers. We have also added managers properties to the map for controls, events, the maps image sprite, HTML markers, and data sources.
Similarly, we have also added the option to set many of the default map SDK settings directly into the root atlas namespace of the SDK. By doing this, all map instances that are created on a page and any service clients created, will use these settings as defaults. Previously, every map instance and service client added to your application required passing in your Azure Maps key during initialization of that feature. This meant that you would have to set this same setting multiple times in your application which can become cumbersome. By setting your key in the root atlas namespace you only need to specify it once in your application, making it easy to update in the future if needed.
atlas.setSubscriptionKey('Your Azure Maps Key');
Several other settings such as language and user region information can also be set as defaults in the root atlas namespace. It is important to note that these are default values which will be used if the equivalent option isn’t specified when initializing a map instance or service client. If, for example, you pass in a different language when initializing the map, it will use that one instead. This is useful in scenarios where you may want to show multiple maps on a page in different languages.
All of these developer focused improvements make it much easier to develop applications with Azure Maps while also increasing performance and reducing the amount of code required to write your application.
New data source and layering model
Previously, the map control only provided the ability to add vector spatial data that was in GeoJSON format to the map. This data was added to a layer which created and managed its own data source behind the scenes. Modifying any data in a layer required overwriting the existing layer which is inefficient and requires code that is unintuitive as you can see in the sample code below.
var myPins = [/* Array filled with pin data */];

//Add pins to map.
map.addPins(pins, {
     name: 'MyPinLayer'
});

//Create a new pin to add to layer.
var pin = new atlas.data.Feature(new atlas.data.Point(lon, lat));

//Add the pin to array of pins.
myPins.push(pin);

//Update the layer by overwriting all data in the layer. This is unintuitive and creates a performance hit.
map.addPins(pins, {
     name: 'MyPinLayer',
     overwrite: true
});
With this release we have separated the data source from the layer, which provides several benefits, such as the ability to render a single data source using multiple layers while only maintaining a single instance of the data source, thus reducing memory usage, improving performance, and creating an API that is a lot easier to understand as you can see below.
//Create a data source and add it to the map.
var dataSource = new atlas.source.DataSource();
map.sources.add(dataSource);

//Create a layer that defines how to render the shapes in the data source and add it to the map.
var myPinLayer = new atlas.layer.SymbolLayer(dataSource);
map.layers.add(myPinLayer);

//Add pins to the data source.
dataSource.add([/* Array filled with pin data */]);

//Create a new pin to add to map.
var pin = new atlas.data.Feature(atlas.data.Point([lon, lat]));

//Add the pin to the data source, the map automatically updates in the most efficient manner possible.
dataSource.add(pin);
In addition to having DataSource class for GeoJSON formatted data, we have also added support for vector tile services via a new VectorTileSource class. These data sources can be attached to the following layers which define how the data is rendered on the map.
- Bubble Layer – Render point data as scaled circles using a pixel radius.
- Line Layer – Render lines and polygon outlines.
- Polygon Layer – Render the filled area of polygons.
- Symbol Layer – Render point data as icons and text.
There is also a TileLayer class which allows you to superimpose raster tiled images on top of the map. Rather than attaching this layer to a data source, the tile service information is specified as options of the layer.
While creating this new data source and layering model in the SDK we also more than doubled the functional features and rendering options for visualizing data on the map.
Connect multiple layers to a data source
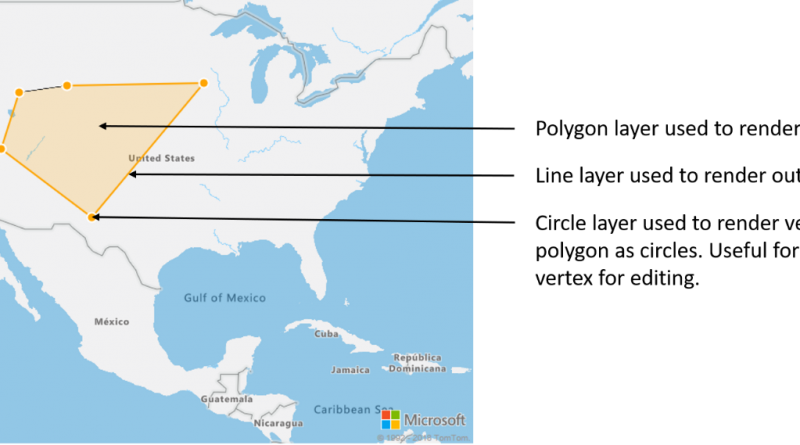
As mentioned previously, you can now attach multiple layers to the same data source. This may sound odd, but there are many different scenarios where this becomes useful. Take for example the scenario of creating a polygon drawing experience. When letting a user draw a polygon we should render the fill polygon area as the user is adding points to the map. Adding a styled line that outlines the polygon will make it easier see the edges of the polygon as it is being drawn. Finally adding some sort of handle, such as a pin or marker, above each position in the polygon would make it easier to edit each individual position. Here is an image that demonstrates this scenario.

To accomplish this in most mapping platforms you would need to create a polygon object, a line object, and pin for each position in the polygon. As the polygon is modified, you would need to manually update the line and pins. The work required to do this becomes complex very quickly.
With Azure Maps all you need is a single polygon in a data source as shown in the code below.
//Create a data source and add it to the map.
var dataSource = new atlas.source.DataSource();
map.sources.add(dataSource);

//Create a polygon and add it to the data source.
dataSource.add(new atlas.data.Polygon([[[/* Coordinates for polygon */]]]));

//Create a polygon layer to render the filled in area of the polygon.
var polygonLayer = new atlas.layer.PolygonLayer(dataSource, 'myPolygonLayer', {
     fillColor: 'rgba(255,165,0,0.2)'
});

//Create a line layer for greater control of rendering the outline of the polygon.
var lineLayer = new atlas.layer.LineLayer(dataSource, 'myLineLayer', {
     color: 'orange',
     width: 2
});

//Create a bubble layer to render the vertices of the polygon as scaled circles.
var bubbleLayer = new atlas.layer.BubbleLayer(dataSource, 'myBubbleLayer', {
     color: 'orange',
     radius: 5,
     outlineColor: 'white',
     outlineWidth: 2
});

//Add all layers to the map.
map.layers.add([polygonLayer, lineLayer, bubbleLayer]);
See live examples.
New easy to manage Shape class
All vector-based data in the Azure Maps Web SDK consist of GeoJSON objects which at the end of the day is just JSON objects that follow a defined schema. One limitation with using GeoJSON data is that if you modify the data, the map isn’t aware of the change and until you remove and replace the object in the map. To make things easier and more intuitive we have added a new Shape class which can wrap any GeoJSON feature or geometry. This class provides several functions that make it easy to update GeoJSON data and have those changes instantly reflected in the data source the Shape was added to. We found this to be so useful we automatically wrap all GeoJSON objects added to the DataSource class.
Take for example the scenario where you want to update the position of a data point on the map. Previously you had to manage the data in the layer separately and then overwrite the layer as show in the code below.
//Create a pin from a point feature.
var pin = new atlas.data.Feature(new atlas.data.Point([-110, 45]));

//Add a pin to the map.
map.addPins([pin], {
     name: 'MyPinLayer'
});

//Update pins coordinates... Map does not update.
pin.geometry.coordinates = [-120, 30];

//Overwrite all pins in the layer to update the map.
map.addPins([pin], {
     name: 'MyPinLayer',
     overwrite: true
});
This is unintuitive and a lot more work than it should be. By wrapping the data point with the Shape class, it only takes one line of code to update the position of the data point on the map as show in the code below.
//Create a data source and add it to the map.
var dataSource = new atlas.source.DataSource();
map.sources.add(dataSource);

//Create a layer that defines how to render the shapes in the data source and add it to the map.
var myPinLayer = new atlas.layer.SymbolLayer(dataSource);
map.layers.add(myPinLayer);

//Create a pin and wrap with the shape class and add to data source.
var pin = new atlas.Shape(new atlas.data.Point([-110, 45]));
dataSource.add(pin);

//Update the coordinates of the pin, map automatically updates.
pin.setCoordinates([-120, 30]);
Tip: You can easily retrieve the shape wrapped version of your data from the data source rather than wrapping each object individually.
Data driven styling of layers
A key new feature in this update is the new data-driven styling capabilities with property functions. This allows you to add business logic to individual styling options which take into consideration the properties defined on each individual shape in the attached data source. The zoom level can also be taken into consideration when the layer is being rendered. Data-driven styles can greatly reduce the amount of code you would normally need to write and define this type of business logic using if-statements and monitoring map events.
As an example, take into consideration earthquake data. Each data point has a magnitude property. To show the related magnitude of each data point on a map we might want to draw scaled circles using the BubbleLayer when the larger the magnitude of a data point, the larger the radius of the circle. The following code demonstrates how to apply data-driven style to the radius option in the BubbleLayer, which will scale the radius based on the magnitude property of each data point on a linear scale from 2 pixels, magnitude of 0 to 40 pixels, and the magnitude is 8.
var earthquakeLayer = new atlas.layer.BubbleLayer(dataSource, null, {
     radius: ['interpolate', ['linear'], ['get', 'magnitude'],
         0, 2,
         8, 40
     ]
});
We could also apply a similar data driven style which defines the color of each circle and generate a map that looks like the following.

See live example.
Spatial math library
A new spatial math library has been added to the atlas.math namespace which provides a collection of useful calculations that are commonly needed in many map applications. Some of the functionality provides the ability to calculate:
- Straight line distance between positions.
- The length of a line or path.
- The heading between positions.
- Distance conversions.
- Cardinal splines, which allow nice smooth curved paths to be calculated between a set of points.
- Geodesic paths, which is the direct path between two points taking into consideration the curvature of the earth.
- Intermediate positions along a path.
See live example.
This library provides many common simple spatial calculations. If you require more advance spatial calculations such as geometry unions or intersections, you may find the open source Turf.js library useful. Turf.js is designed to work directly with GeoJSON data which is base format for all vector data in Azure Maps, making it easy to use with Azure Maps.
Support for geospatially accurate circles
GeoJSON schema does not provide a standardized way to define a geospatially accurate circle. For this reason the Azure Maps team has standardized a common way to define a geospatially accurate circle in GeoJSON without breaking the schema as shown in our documentation. You can define GeoJSON objects using pure JSON in the Azure Maps web control or using the helper classes in the atlas.data namespace. Here is an example of how to define a circle with a 1000-meter radius over Seattle.
Using pure JSON
var circle = {
     "type": "Feature",
     "geometry": {
         "type": "Point",
         "coordinates": [-122.33, 47.6]
     },
     "properties": {
         "subType": "Circle",
         "radius": 1000
     }
};
Using helper classes in the atlas.data namespace
var circle = new atlas.data.Feature(new atlas.data.Point([-122.33, 47.6]), {
     subType: "Circle",
     radius: 1000
});
When rendering these circles, the Azure Maps web control converts this Point feature into a circular Polygon which can be used with many of the different rendering layers. Here is a map where the circle is rendered as a filled polygon.

See live example.
One key difference between geospatially accurate circles and circles generated by the BubbleLayer is that the bubble layer assigns a pixel radius for each bubble. As the user zooms the map, the pixel radius doesn’t change, thus the map area covered by the bubble does. A geographically accurate circle has its vertices bounded to coordinates on the map. As the map is zoomed, the circle scales and maintains the area it covers.
It is important to note that these circles may not always appear to be circular due to the Mercator projection used by the map. In fact, the closer the circle is to the North or South pole, the larger and more elliptical it may appear, however, the area it represents on a globe is circular. The following map shows two circles that have a radius of 750KM (750,000 meters). One circle is rendered over Greenland which is close to the North pole, while the other is rendered over Brazil, close to the equator.

See live example.
Backwards compatibility
If you have already developed an app with Azure Maps you might be asking yourself if this means you have to rewrite your whole application. The answer is no. We have worked hard to maintain backwards compatibility. We have marked many of the old functions as deprecated in our documentation to prevent developers from using these in future applications, but will continue to support these features as they are in version 1 of the SDK.
All this being said, we have come across a few applications which have skipped an important step when using the map control. When an instance of the map control is created it needs to load several resources such as a Web-GL canvas. This happens fairly quickly, but occurs asynchronously which means that the next line of code after creating the map instance can potentially be called before the map has finished loading. If that line of code tries to interact with the map before it is loaded, an error can occur. To resolve this, the “load” event should be attached to the map and functionality that needs to run after the map has loaded should be added into the callback of the event. Currently if you aren’t using the map’s load event, your application may work fine most of the time, but on another user’s device it may not. Here is some code that shows the issue and how to resolve it.
Issue
//Initialize a map instance.
var map = new atlas.Map('myMap', {
     'subscription-key': 'Your Azure Maps Key'
});

//Additional code that interacts with the map. The map may not be finished loading yet.
Resolution using older API interface (still supported)
//Initialize a map instance.
var map = new atlas.Map('myMap', {
     'subscription-key': 'Your Azure Maps Key'
});

//Wait until the map resources have fully loaded.
map.addEventListener("load", function (e) {
     //Add your additional code that interacts with the map here.
});
Resolution using the new API interface
//Add your Azure Maps subscription key to the map SDK.
atlas.setSubscriptionKey('Your Azure Maps Key');

//Initialize a map instance.
var map = new atlas.Map('myMap');

//Wait until the map resources have fully loaded.
map.events.add('load', function (e) {
     //Add your additional code that interacts with the map here.
});
We want to hear from you!
We are always working to grow and improve the Azure Maps platform and want to hear from you.
- Have a feature request? Add it or vote up the request on our Feedback site.
- Found a map data issue? Send it directly to our data provider using TomTom’s Map Share Reporter tool.
- Having an issue getting your code to work? Have a topic you would like us to cover on the Azure blog? Ask us on the Azure Maps forums. We’re here to help and want to make sure you get the most out of the Azure Maps platform.
- Looking for code samples or wrote a great one you want to share? Join us on GitHub.
Source: Azure Blog Feed